Spring Transaction Fundamentals
12 May 2023

In this article we’ll have a closer look at Spring Transaction Management, a topic that is fundamental to real word projects and a big reason to use the Spring Framework in your enterprise applications. However, when first starting out the topic can be a bit daunting. But as always, let’s start with the basics and work our way up from there.
What exactly is a transaction?
Simply put, a transaction is a group of related actions that need to be executed together. This is often called a “logical unit of work” and translates to All-or-Nothing. So either every single unit of work completes successfully or the transaction is not completed. Let’s look at a basic example of this.
@Service
class PlantService(private val plantRepository: PlantRepository, private val plantPublisher: PlantPublisher) {
    @Transactional
    fun addPlant(plantDto: PlantDto) {
        val newInstance = Plant.newInstance(plantDto)
        plantRepository.save(newInstance);
        plantPublisher.publish(newInstance);
    }

}
Here we have a fictional PlantService that is used to add a Plant. This function should always contain two steps: Save a plant to a database and then broadcast it with a publisher. Either both of them succeed or the transaction is rollbacked. This ensures the data integrity and makes sure we don’t broadcast a PlantEvent that wasn’t saved in the database and therefore doesn’t exist. To further understand this set of transaction guarantees, I recommend reading up on ACID Properties and the CAP Theorem.
What does @Transactional do?
The @Transactional annotation can be used for declarative transaction management. Under the hood, Spring uses Aspect-Oriented Programming to find all methods or classes annotated with @Transactional annotations. Afterwards it will intercept them with the TransactionInterceptor. In our example above, this would look similar to this.
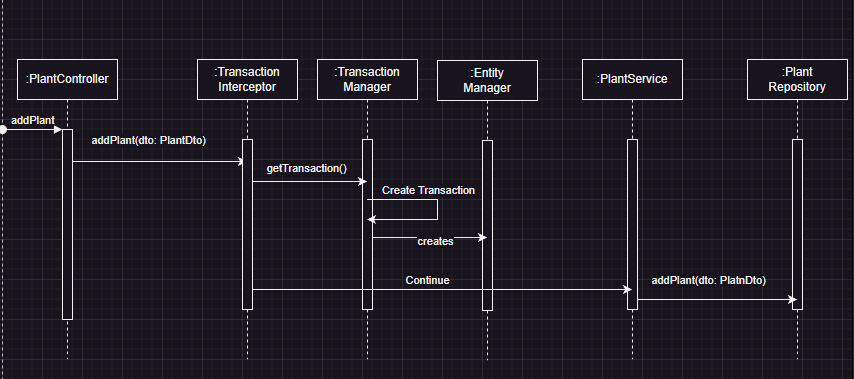
- We receive a HTTP Request to add a beautiful Plant to our Database.
- The PlantController calls the Method annotated with @Transaction in the PlantService.
- The TransactionInterceptor picks this up and intercepts.
- The TransactionManager handles the creation of the Transaction if necessary, depending on the specified propagation.
- The procedure continues and the addPlant is executed.
If you don’t want to use the declarative approach, there is always the transactionTemplate at your hands to manage your transactions programmatically, from the spring documentation:
// use constructor-injection to supply the PlatformTransactionManager
class SimpleService(transactionManager: PlatformTransactionManager) : Service {

    // single TransactionTemplate shared amongst all methods in this instance
    private val transactionTemplate = TransactionTemplate(transactionManager)

    fun someServiceMethod() = transactionTemplate.execute<Any?> {
        updateOperation1()
        resultOfUpdateOperation2()
    }
}
Transaction Propagation
There are different transaction propagation strategies in Spring. In simple terms, this just tells spring where to start and pause a transaction in your business domain. This will reflect in the getTransaction call to the TransactionManager above and create your specified Transaction for you.
REQUIRED
    @Transactional(propagation = Propagation.REQUIRED)
    fun addPlant(plantDto: PlantDto) {
        ...
    }
This is the spring default. Spring checks if there already exists an active transaction and if nothing exists, it creates a new one. This is equal to just annotating the method with @Transactional.
REQUIRES_NEW
    @Transactional(propagation = Propagation.REQUIRES_NEW)
    fun addPlant(plantDto: PlantDto) {
        ...
    }
This tells Spring to suspend the current transaction if it exists and create a new one.
SUPPORTS
 @Transactional(propagation = Propagation.REQUIRED)
    fun addPlant(plantDto: PlantDto) {
        ...
    }
Here, Spring also checks if there is an active transaction, and will reuse the active one if it exists. However, if there is no active transaction, it will be executed non-transactionally.
MANDATORY
 @Transactional(propagation = Propagation.MANDATORY)
    fun addPlant(plantDto: PlantDto) {
        ...
    }
This works the same as REQUIRED, but will throw an IllegalTransactionStateException if no active Transaction was found.
NEVER / NOT_SUPPORTED
 @Transactional(propagation = Propagation.NEVER / NOT_SUPPORTED)
    fun addPlant(plantDto: PlantDto) {
        ...
    }
And at last, there is NEVER / NOT_SUPPORTED. The former will throw an exception when there is an active Transaction and the latter will just suspend it and run it non-transactionally.
Transaction Isolation
Since you have surely read up on the ACID Properties above 😉 this will be nothing new to you. Isolation describes the visbility between concurrent transactions. There are a couple of side effects that can happen here.
- Dirty read: We read the uncommited change of a concurrent transaction
- Nonrepeatable read: When we read a value twice, we have different results because a concurrent transaction updated the same entry in the meantime.
- Phantom Read: Different entries after reread of a query if another transaction adds or removes rows in the range that was queried.
DEFAULT
As the name suggests this is Springs default and the isolation level that will be used is the one of the defined RDBMS.
READ_UNCOMMITED
 @Transactional(isolation = Isolation.READ_UNCOMMITTED)
    fun addPlant(plantDto: PlantDto) {
        ...
    }
This is the lowest of all isolation levels and allows for the most concurrent acces, this will suffer from all sideffects mentioned above and is also disallowed by Postgres & Oracle Databases.
READ_COMMITED
This prevents the Dirty Reads sideffect mentioned above.
REPEATABLE_READ
This prevents the Dirty Reads and non-repeatable reads sideffects mentioned above.
SERIALIZABLE
This is the highest level of any isolations. It prevents all concurreny side effects but will also lead to drastically slower performance because it executes concurrent calls sequentially.
A note on Optimistic & Pessimistic Locking
Depending on the isolation level you choose, a specific resource is going to be locked until a give transaction commits or rollbacks. This is called pessimistic locking because it assumes the probability of multiple resources modifying the same entries at the same time are high.
However, this comes at a cost because it is expensive to keep transaction open with a lock on a database for long amounts of time.
In the context of a standard web application, it is reasonable to use the optimistic locking approach because most operations span through multiple HTTP requests. We can therefore assume that multiple transactions will rarely interfere with each other and we don’t need locks. This is an application side check that can be achieved with a @Version annotation in Hibernate. It is then used to establish wheter a version of an entity has changed between fetching and updating it and will throw an OptimisticLockingException when this happens.
Using @Transactional & Pitfalls
So what would be my advice on how to use @Transactional in your spring web application? Generally, I advise to structure your services like this:
@Service
@Transactional(readOnly = true)
class PlantService(private val plantRepository: PlantRepository ) {

    fun findPlantById(id: String): Plant? {
        return plantRepository.findById(id)
    }

    @Transactional
    fun addPlant(plantDto: PlantDto) {
        val newInstance = Plant.newInstance(plantDto)
        plantRepository.save(newInstance);
    }

}
Set a @Transactional annotation with the readOnly flag on the class level so that you are sure that no method in your Service is forgotten. When it is a readOnly operation there are also additional optimizations under the hood which you can read up on here: Vlad Mihalcea
I also like to directly create a custom Annotation that encapsulates both of these properties like this:
@Target(AnnotationTarget.FUNCTION, AnnotationTarget.TYPE)
@Retention(AnnotationRetention.RUNTIME)
@Service
@Transactional(readOnly = true)
annotation class DataService(
)
One common pitfall to avoid is putting @Transactional on non-public methods. If you annotate protected, private or package visible methods with @Transactional, no error will be raised but the method won’t be run with your configured transactional settings. You can work around this by defining a transactionAttributeSource bean.
@Bean
TransactionAttributeSource transactionAttributeSource() {
return new AnnotationTransactionAttributeSource(false);
}
or creating and injecting a new service which will create a new transaction for you.
Conclusion
I hope this article served as a starting point on how to use Transactions with spring. However it will take a long time to master these concepts. Especially when you apply them, to distributed systems and different databases. Some additional resources that inspired me to write this article and to deepen your knowledge you can find below.
Sources
- Vlad Mihalcea – The definitive blog for everything JPA/Hibernate.
- Spring Docs – official spring documentation regarding transactions.
- Jooq Blog – Best Practices and Lessons Learned from Writing Awesome Java and SQL Code.